
Often times I’ll export an HD video from Adobe Premiere Pro and the file size will be hundreds of megabytes in size, or even gigs of data. This is great for a perfect picture and great resolution, however sometimes it’s nice to be able to reduce the file size for easier uploading to the web, or putting on a thumb drive for quick transport. In this guide I’ll tell you how to do this, specifically for a Mac.
I’ll be using a free software titled MPEG Streamclip which is compatible with and requires:
“at least Mac OS X 10.2 (Jaguar) and QuickTime 6. It is also compatible with Mac OS X 10.3.x (Panther), Mac OS X 10.4.x (Tiger), Mac OS X 10.5.x (Leopard), Mac OS X 10.6.x (Snow Leopard), OS X Lion, OS X Mountain Lion, and QuickTime 7. It works with PowerPC and Intel based Macs.”
This is nice because it’s compatible with basically every system.
Simply follow the link to download and install to your system. Once you’ve opened up the program you’ll be greeted with this simple interface.

For this guide I’ll be converting this video, an .mp4 file that is 529MB.

You simply drag and drop the video from any folder or your desktop to the box with the five blue dots to load the video into the program.
Once the video is loaded you’ll be able to scrub through If you choose by the bottom playhead.
 Once you’re ready, navigate to the Menu bar and choose an export option. For this application I’ll choose “Export to QuickTime”

which will then bring up another, more confusing menu. Don’t be worried though, this isn’t too hard to navigate, as most of these setting don’t need to be manipulated, although they’re very convenient for more advanced users.

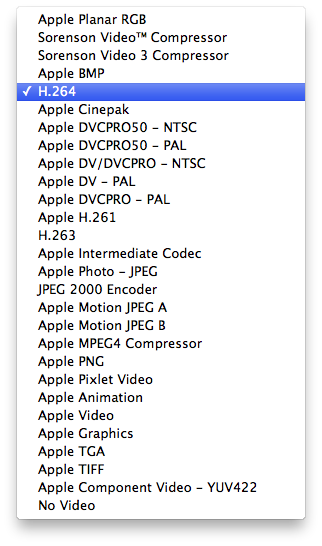
First you’ll need to choose your compression codec, there are quite a lot to choose from, however since we’re going for maximum compression with minimal quality degradation I like to use H.264.
After this, the big question is how much compression you want. On the one hand you can compress the video a lot, and get a very small video with terrible resolution. Or on the other hand, you can do the least amount of compression, and have a big, pretty, file. The choice is yours, however for me, I find that 75-80% is my sweet spot for minimal loss of quality. So I’ll go for something in that range.
![]()
Next you’ll want to choose a sound compression, I like the following, with the following settings, because again, while they compress the data, the quality is usually not degraded. If however you do feel like you’ve muddied the sound, you can always go back and skip over the audio portion to leave it uncompressed altogether.
![]()
If you’d like to scale the video down, to further reduce the file size, you can do so with the next section. Usually I’ll leave the video unscaled for maximum resolution. If however you decide to scale, be sure to know if your video is 4:3 or 16:9 and follow that.

Again, usually I don’t need to manipulate the rest of these options, as these are more a case-by-case basis, not every day use per se.

After you’ve set your parameters you’re ready to go. Hit “Make Movie”
You’ll be greated with a save prompt, select the title and where to save it, and the program will do it’s thing for you after that.

Shortly afterward you’ll have a new video in the destination folder with a reduced file size.

From 529 MB to 83.6 MB, with no noticeable quality loss.
Done. Thanks MPEG Streamclip!
